First this guide is for resizing a disk that is not LVM. For that see Resizing a disk in Proxmox that contains an LVM file system.
If you want to shrink a disk, please note that it is generally a bad idea because you might loose data. Proxmox does not support this either. You will have to find your own guide and do it manually.
This entire process can be done while the system is running.
1. Resizing in Proxmox
You will first need to enlarge the disk in Promox, you can either do this via the CLI or via the Web UI.
Web UI
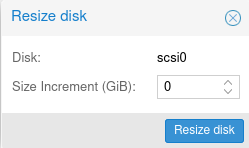
Open up the hardware section of your VM. Afterwards select the disk you wish to resize. In this case it is scsi0.
![]()
Now click on the Resize Disk option.
![]()
A pop up should appear asking you the incrementation value. Here you can enter the size increment. This means the size that you want to add. For example if the disk is currently 10 GB and you want it to have 50 GB total, you should enter 40 and not 50.
When you have selected a value click on resize.
CLI
SSH into the machine on which the VM is hosted. Then enter the following:
qm resize <VM_ID> <DISK> <SIZE_INCREMENT>
For example, as in the case above.
qm resize 250031 scsi0 +40G
2. Resizing in Ubuntu
For resizing our disk in Ubuntu we will use gparted. This should be installed by default.
Identify the disk that you resized. You can do this by typing lsblk this will show you an overview of all block devices.
In my case it is /dev/sda. To open it up with gparted run the following
sudo gparted /dev/sda
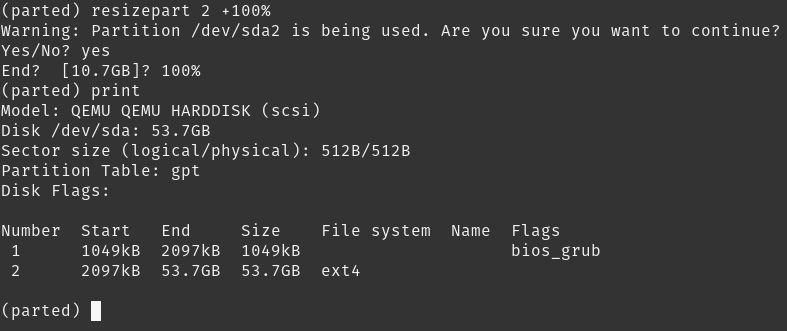
Once that is open you should get a welcome message and a new console line. Now typ print. Normally a message should appear that not all available disk space is visible to the system. You can choose between Fix and Ignore, enter Fix. After that you should see all the partitions printed out with their size.

In my case I want to expand the second partition since this contains the root filesystem.
resizepart <PARTITION_NUMBER> <INCREMENT>
# For example:
resizepart 2 100%
If you get a message say what the End? value should be you can also enter 100%.
You can now exit gparted by writing quit.
After that is done you should resize the filesystem by using resize2fs.
sudo resize2fs /dev/sda2
And that's it. Your system now more space.